KPI Details Displayed in a Detail Table
A detail table is a specific table of a collector that contains further information about a KPI. This information is useful for the interpretation of a KPI, because the KPI value is only a number and in some cases, you need more details about it.
For example, if a KPI that collects the number of failed background jobs has the value 3, then in the detail table for background jobs, you can find names of those three jobs with their runtimes, schedule times, the reason for the failure and other information.
Not all KPIs have the possibility to display further information in a detail table. To check whether a KPI includes a detail table, see the chapter Displaying a Detail Table of a Specific KPI.
You can create your own detail table only for custom KPIs assigned to the custom collectors and the collector for user-defined SQL.
For a description of how to create a detail table, see the chapters Creating a Detail Table for a Custom KPI Assigned to a Custom Collector and Creating a Detail Table for a Custom KPI Assigned to the Collector for a User-defined SQL.
Displaying a Detail Table of a Specific KPI
There are two ways to display a detail table for a KPI:
Option 1:
-
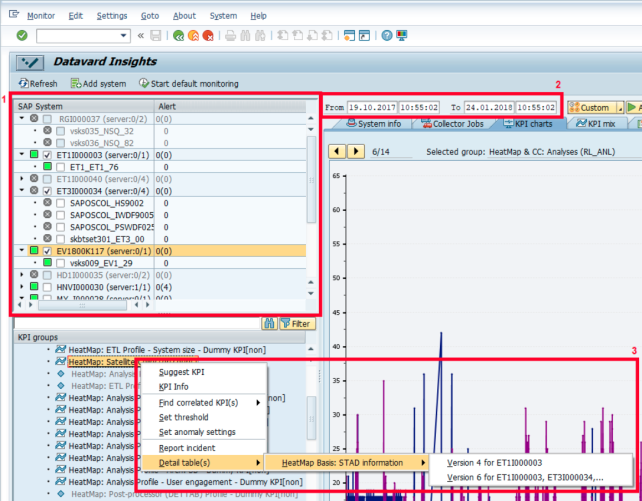
You can narrow your search by selecting a particular system and a server for which the KPI is displayed (1) and by specifying a time interval (2).
-
Right-click a KPI under KPI groups and click Detail table(s). The context menu contains all versions of detail tables with relevant systems based on this selection.
NOTE A detail table can have multiple versions. A newer version of a default detail table might exist due to an update of CrystalBridge® Monitoring or due to the monitoring of satellite systems that have a different CrystalBridge® Monitoring version. In this case, you must choose the latest version of the detail table.
A newer version of a custom detail table is also created if you change the data structure of a detail table. This only occurs if you create your custom collector with a detail table.
Option 2:
-
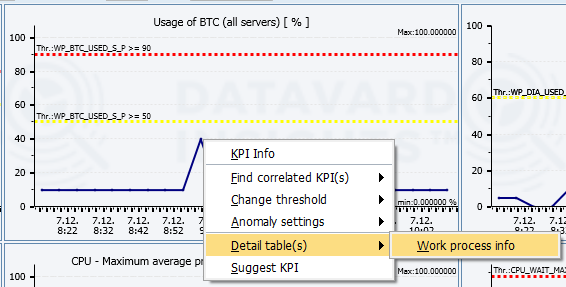
Select a KPI under KPI groups and go to the KPI charts tab.
-
Right-click a point in the KPI chart and click Detail table(s). If the KPI has a detail table assigned, the detail table is displayed.
When you click a particular version of a detail table, you can view all the selected systems on which the assigned KPI is monitored in the header. In this case, if you have chosen a server under System landscape, the title Detail table is server-dependent appears above in the table.
The SAP ALV grid cannot display more than 128 characters in one column. If the columns of a detail table contain more characters, the value is truncated.
If you want to display the complete value, click ![]() Export to download the requested records in their original size.
Export to download the requested records in their original size.
You can find a list of all the available detail tables in the Details tab.
If you select a detail table and its data is not displayed, this could be for one of the following reasons:
-
The monitoring of the KPI assigned to this detail table was not started. The message Data was not collected yet for a detail table appears. In this case, schedule the monitoring of the KPI assigned to the detail table as described in the chapter Scheduling the Monitoring of KPIs.
-
The KPI assigned to this detail table is collected on different servers and systems and at different times compared with the one that is selected on the main screen. The message No data exist for selected SIDs and time period appears. In this case, select the system or server and set a time interval in which the KPI assigned to this detail table was collected.
Proceed as follows to check which KPI belongs to a specific detail table:
-
Start transaction /DVD/MON and click Settings > Monitoring settings. Alternatively, you can start transaction /DVD/MON_CUST.
-
Select a KPI under KPI definitions.
-
Double-click Assigned details.
The details are displayed.
Creating a Custom Detail Table
You can create your own detail table only for custom KPIs assigned to the custom collectors and the collector for user-defined SQL.
For a description of how to create a detail table, see the chapters Creating a Detail Table for a Custom KPI Assigned to a Custom Collector and Creating a Detail Table for a Custom KPI Assigned to the Collector for a User-defined SQL.
Creating a Detail Table for a Custom KPI Assigned to a Custom Collector
This chapter explains how to create a detail table for a custom KPI assigned to a custom collector.
For more information about detail tables in general, see the chapter KPI Details Displayed in a Detail Table.
Prerequisites
The created custom KPI has been assigned to a custom collector. For more information about creating this type of custom KPI, see the chapter Creating a KPI with a Custom Collector in ABAP.
Step 1:
Create a detail table for a custom KPI assigned to a custom collector
-
Start transaction /DVD/MON and click Settings > Collector settings. Alternatively, you can start transaction /DVD/MON_COL.
-
Find your custom collector starting with Y or Z.
-
Select the collector.
-
Double-click Detail tables.
-
Click New Entries.
-
Fill out the columns Detail table name and Detail table description.
NOTE You can only create a custom detail table if it starts with the capital letters Y* or Z*.
NOTE If the name of your detail table is the same as a structure or a table type in the DDIC, the description for the fields of the detail table will be retrieved from the DDIC structure.
In other cases, if the detail table name is not included in the DDIC, the fields of the detail table are defined by the custom collector. Here, the technical names of the fields are used as their descriptions.
-
Click Save.
-
Define which information is stored in the detail table.
You must implement your own logic for the collection of details into the detail table. To display the KPI details in CrystalBridge® Monitoring, you must save them using the collector method add_detail_table().
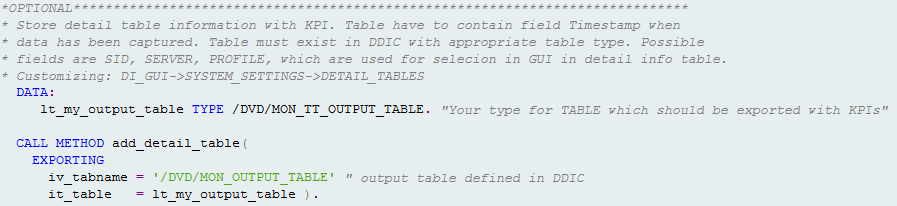
Instead of /DVD/MON_OUTPUT_TABLE, use your own created detail table.
NOTE When you create a custom detail table, the fields of the detail table are not displayed in the Fields folder. The fields are only generated after the first run of the custom collector.
Step 2:
Assign the detail table to the custom KPI
-
Click Settings > Collector settings.
-
Find your custom collector starting with Y or Z.
-
Select the collector.
-
Double-click Detail tables.
-
Select your created detail table and double-click Assignment.
-
Click New Entries.
-
Fill out the custom KPI name that you want to assign to the custom detail table.
-
Click Save.
-
The detail table is now assigned to your custom KPI.
The same procedure for a custom KPI assigned to the Collector for User-defined SQL is described in the chapter Creating a Detail Table for a Custom KPI Assigned to the Collector for a User-defined SQL.
Creating a Detail Table for a Custom KPI Assigned to the Collector for a User-defined SQL
This chapter explains how to create a detail table for a custom KPI assigned to Collector for User-defined SQL.
For more information about detail tables in general, see the chapter KPI Details Displayed in a Detail Table.
Prerequisites
The created custom KPI has been assigned to the Collector for User-defined SQL. For more information about creating this type of custom KPI, see the chapter Creating a KPI via an SQL SELECT Statement.
Step 1:
Create a detail table for a custom KPI assigned to the Collector for User-defined SQL
Proceed as follows to define a custom detail table that collects data according to the specified SQL statement:
-
Start transaction /DVD/MON and click Settings > Collector settings. Alternatively, you can start transaction /DVD/MON_COL.
-
Select the Collector for User-defined SQL: /DVD/MON_CL_COL_SQL.
-
Double-click Detail tables.
-
Click New entries.
-
Fill out the detail table name and its description.
NOTE You can only create a custom detail table if it starts with a capital Y* or Z*. If the name of your detail table is the same as a structure or a table type in the DDIC, the description for the fields of the detail table will be retrieved from the DDIC structure. In other cases, if the detail table name is not included in the DDIC, the fields of the detail table are defined by the custom collector. Here, the technical names of the fields are used as their descriptions. -
Click Save.
-
Double-click Collector > Inputs & rules.
-
Click Edit in the column next to the input table /DVD/MON_KPISQL2 (table for a detail table).
-
Click
 Switch mode (Ctrl+F1) and then
  Create new records (F6).
 -
Enter the name of your custom detail table and fill out the SQL statement.
If the SQL statement is longer than 255 characters, it must be divided into multiple rows starting from the first. Use the column Rule nr. to number the parts of the SQL statement.The fields of the custom detail table are created dynamically according to the columns you specified in the SQL statement.
NOTE Note that one detail table can have only one SQL statement.Comments for SQL Statements
If you want to retain certain SQL statements for future use without executing them within the SQL collector, you can comment them out by adding '--' at the beginning of the SELECT statement. If you cannot add two extra characters to the row due to the maximum character limit of 128 in one row, we recommend overwriting the first two characters of the SELECT statement (use '--LECT' instead of 'SELECT'). The comment function is supported for both input tables /DVD/MON_KPISQL1 and /DVD/MON_KPISQL2.
Placeholder Usage
In your SQL statement, you can use a placeholder. These placeholders allow you to create a more generic SQL statement. By default, these placeholders are replaced by relevant values directly in the SQL statement when the SQL collector is executed.
Placeholder
Returning value of
Usage example
<LASTRUN>
UTC timestamp of the last run of the collector job (YYYYMMDDHHMMSS)
WHERE timestamp_from >= '<LASTRUN>'
<TIMESTAMP>
UTC timestamp of the current collector job execution (YYYYMMDDHHMMSS)
WHERE timestamp_to <= '<TIMESTAMP>'
<DATE_FROM>
Date of the last run of the collector job (YYYYMMDD)
Low range: ( date > '<DATE_FROM>' OR ( date = '<DATE_FROM>' AND time > '<TIME_FROM>' ) )
<TIME_FROM>
Time of the last run of the collector job (HHMMSS)
Low range: ( date > '<DATE_FROM>' OR ( date = '<DATE_FROM>' AND time > '<TIME_FROM>' ) )
<DATE_TO>
Date of the current collector job execution (YYYYMMDD)
High range: AND ( date < '<DATE_TO>' OR ( date = '<DATE_TO>' AND time <= '<TIME_TO>' ) )
<TIME_TO>
Time of the current collector job execution (HHMMSS)
High range: AND ( date < '<DATE_TO>' OR ( date = '<DATE_TO>' AND time <= '<TIME_TO>' ) )
<SID>
System ID of the monitored system
WHERE mon_sid_field = '<SID>'
<FIRST_START>
Option to specify whether the collector job was executed for the first time
WHERE ib_first_start = 'X'
<MANDT>
Client ID
WHERE sy-mandt = '<MANDT>'
<SERVER>
Name of the server. Not allowed in SQL statements for detail tables
WHERE server_field = '<SERVER>'
<HOST>
Host name. Not allowed in SQL statements for detail tables
WHERE host_field = '<HOST>'
NOTE Bind variables: If supported by the database, you can enable bind variable usage for SQL statements. For more information, see the chapter Bind Variables. -
Click Save.
-
The custom detail table has been defined.
Step 2: Assign the detail table to the custom KPI
-
Click Settings > Collector settings.
-
Find your custom collector starting with Y or Z.
-
Select the collector.
-
Double-click Detail tables.
-
Select your created detail table and double-click Assignment.
-
Click New Entries.
-
Fill out the custom KPI name that you want to assign to the custom detail table.
-
Click Save.
The detail table is now assigned to your custom KPI. For information about how to display detail tables, see the chapter KPI Details Displayed in a Detail Table.
The same procedure for the custom KPI assigned to a custom collector is described in the chapter Creating a Custom Detail Table for a Custom Collector.